Recently we worked on a project that had the requirement to connect to and utilize the Google Calendar API via Apex. It was a very cool project, greatly simplifying the time it takes for users to enter vacation assignments and admins to create company holiday assignments within FinancialForce PSA and sync those assignments to Google Calendar automatically.
One of the difficulties we had to overcome was how to actually get the two systems (Google Apps and Salesforce.com) connected so that the requests could be made to the Google Calendar API. After a bit of online research we created a Service Account on the Google Apps side, which is well documented by Google here.
Once the Service Account was created and access was granted for the Calendar API, we had a private key in PKCS#12 format provided by Google that would allow us to authenticate, but how? This is where the digging began. Because we were using the REST services instead of one of the Google API client libraries, we would have to create JSON Web Token (JWT) to authenticate with from scratch. There is a Google API client library for Salesforce but at the time of this writing it had not been updated since 2009 and does not support a lot of the current Google API definitions.
Building the JWT is well documented in the link above as well, but there were several stumbling blocks on the Salesforce end as we started to construct our proof-of-concept Apex class:
- Portions of the JWT needed to be RSA–SHA256 signed with the private key provided when the Service Account was created.
- The private key was provided in PKCS#12 format, but the Salesforce.com Crypto library supports PKCS#8 keys. From the Crypto documentation, Crypto.sign function: The value of privateKey must be decoded using the EncodingUtil.base64Decode method, and should be in RSA’s PKCS #8 (1.2) Private-Key Information Syntax Standard form. The value cannot exceed 4 KB.
OpenSSL to the rescue. While researching this conversion we came across several posts that, when combined, gave us the solution we needed. In terminal, go to the directory of the .p12 file that was saved during the Service Account creation (you did save that in a safe place, right?):
First, to load the PKCS#12-formatted file into OpenSSL and export it as a .pem file:
openssl pkcs12 -passin pass:<pass value> -in <privatekeyfilename>.p12 -nocerts -passout pass:<pass value> -out key.pem
Next, load the .pem file as PKCS#8 and produce the key as text:
openssl pkcs8 -nocrypt -in key.pem -passin pass:<pass value> -topk8 -outform PEM
This will output the private key that can then be decoded via EncodingUtil.base64Decode to be used in the Crypto.sign method. Make sure to copy all the text between the -----BEGIN PRIVATE KEY----- and -----END PRIVATE KEY-----.
Now that we had the private key, we built the JWT Header and JWT Claimset; be aware that if you’re using the service account for impersonation, the email address of the user to impersonate needs to be provided as part of the Claimset with the sub: attribute. The definitions are well documented in the Google oAuth2 for Server to Server documentation referenced above and examples from that document are below.
JWT Header: {"alg":"RS256","typ":"JWT"}
JWT Claimset:
| iss | Required | The email address of the service account. |
| sub | Optional | The email address of the user for which the application is requesting delegated access. |
| scope | Required | A space-delimited list of the permissions that the application requests. |
| aud | Required | When making an access token request this value is always https://www.googleapis.com/oauth2/v4/token. |
| exp | Required | The expiration time of the assertion, specified as seconds since 00:00:00 UTC, January 1, 1970. This value has a maximum of 1 hour after the issued time. |
| iat | Required | The time the assertion was issued, specified as seconds since 00:00:00 UTC, January 1, 1970. |
{<br> "iss":"761326798069-r5mljlln1rd4lrbhg75efgigp36m78j5@developer.gserviceaccount.com",<br> "sub":"[email protected]",<br> "scope":"https://www.googleapis.com/auth/prediction",<br> "aud":"https://www.googleapis.com/oauth2/v4/token",<br> "exp":1328554385,<br> "iat":1328550785<br> }
With the JWT Header and Claimset strings constructed, they now had to be Base64 Encoded:
String header_encoded = EncodingUtil.base64Encode(blob.valueof(JWT_Header));<br> String claimset_encoded = EncodingUtil.base64Encode(blob.valueOf(JWT_ClaimSet));
Based on the Google Authorization documentation, the final component is a JSON Web Signature (JWS), which is essentially the JWT Header and Claimset combined with a period between ({Base64url encoded header}.{Base64url encoded claim set}) then signed using RSA-SHA256 with the private key using Crypto.sign():
String signature_encoded = header_encoded + '.' + claim_set_encoded;
String signature_encoded_url = EncodingUtil.urlEncode(signature_encoded,'UTF-8');
blob signature_blob = blob.valueof(signature_encoded_url);
Blob private_key = EncodingUtil.base64Decode(KEY);
String signature_blob_string = EncodingUtil.base64Encode(Crypto.sign('RSA-SHA256', signature_blob, private_key));
String JWT = signature_encoded + '.' + signature_blob_string;
With this in hand, we figured we were home free, only to be thwarted one last time. When making the Authorization call, the response returned was Invalid JWT Signature. Back to the research and finally an answer: The equals signs (‘=’) in the encoded signature and JWT payload needed to be removed.
String header_encoded = EncodingUtil.base64Encode(blob.valueof(JWT_Header));
String claimset_encoded = EncodingUtil.base64Encode(blob.valueOf(JWT_ClaimSet));
String signature_encoded = header_encoded + '.' + claim_set_encoded;
<b>signature_encoded = signature_encoded.replaceAll('=','');</b>
String signature_encoded_url = EncodingUtil.urlEncode(signature_encoded,'UTF-8');
blob signature_blob = blob.valueof(signature_encoded_url);
Blob private_key = EncodingUtil.base64Decode(KEY);
String signature_blob_string = EncodingUtil.base64Encode(Crypto.sign('RSA-SHA256', signature_blob, private_key));
String JWT = signature_encoded + '.' + signature_blob_string;
<b>JWT = JWT.replaceAll('=','');</b>
Once this was implemented, authorization was successful and we had our token for world domination (or at least Google Calendar event creation).
System.HttpResponse[Status=OK, StatusCode=200]
{
"access_token": "ya39.yaL_AHIlanwK4_xB0XElKoL5JZWmXFG7YAR3skT4CQivz_D6TGBwxdK6uUVTc7Xl2_-CksthWrwok5qwmAKhapaJndMOnqRqS9mGME3mqhFV40A",
"token_type": "Bearer",
"expires_in": 3600
}
Now we were able to make REST calls to the Google Calendar API with the access token, impersonating the PSA user to get access to their Calendars and Events. This allowed us to build a one-stop screen to improve the user experience while writing the Vacation Assignments to both PSA as well as the user’s calendar and corporate vacation calendar.
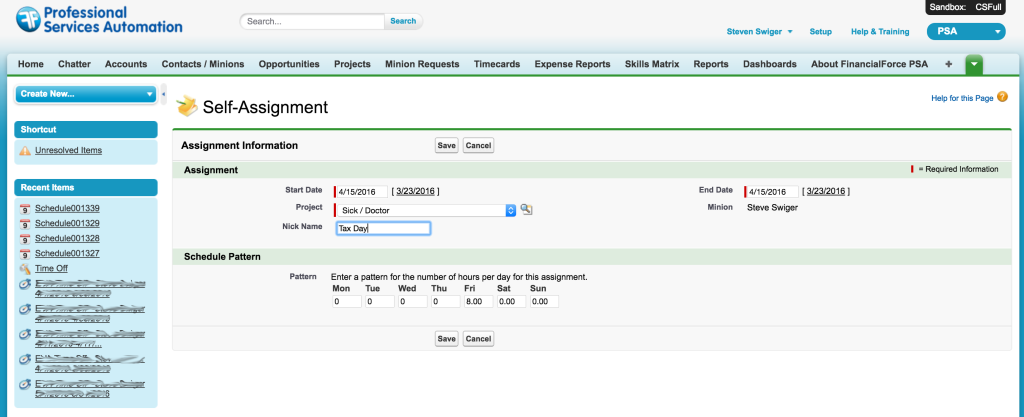
We went from this:
To this:
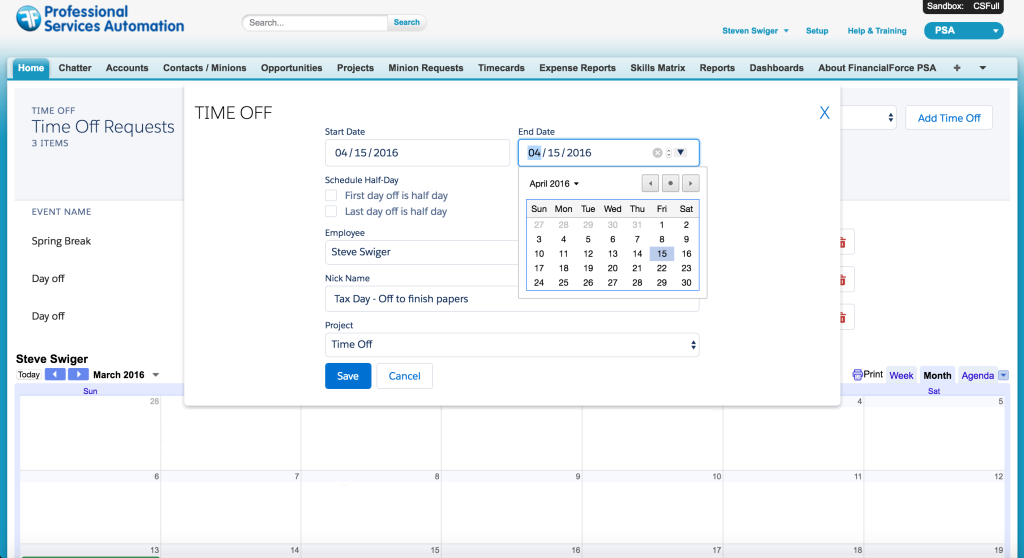
Note the Google Calendar integrated into the TimeOff screen that is automatically updated on save:
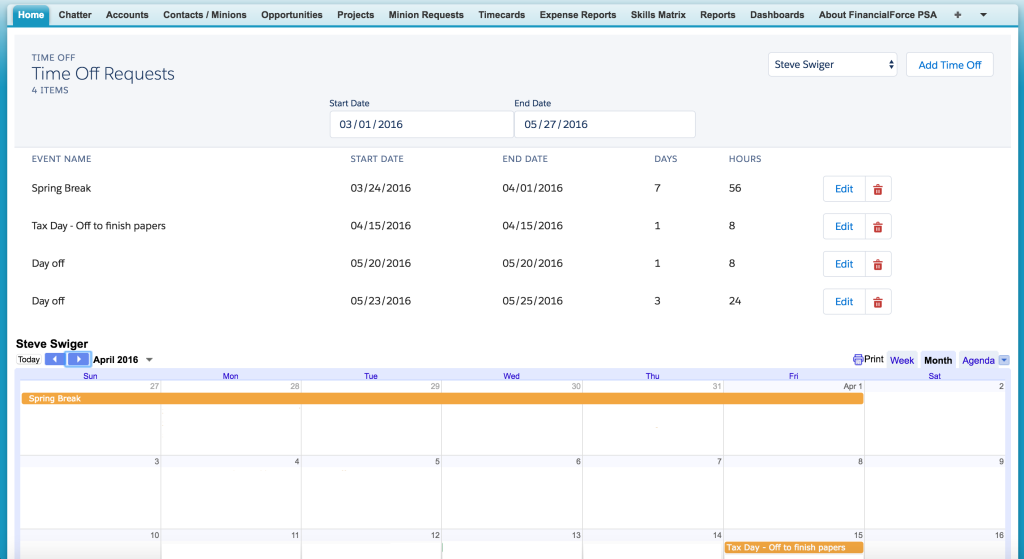
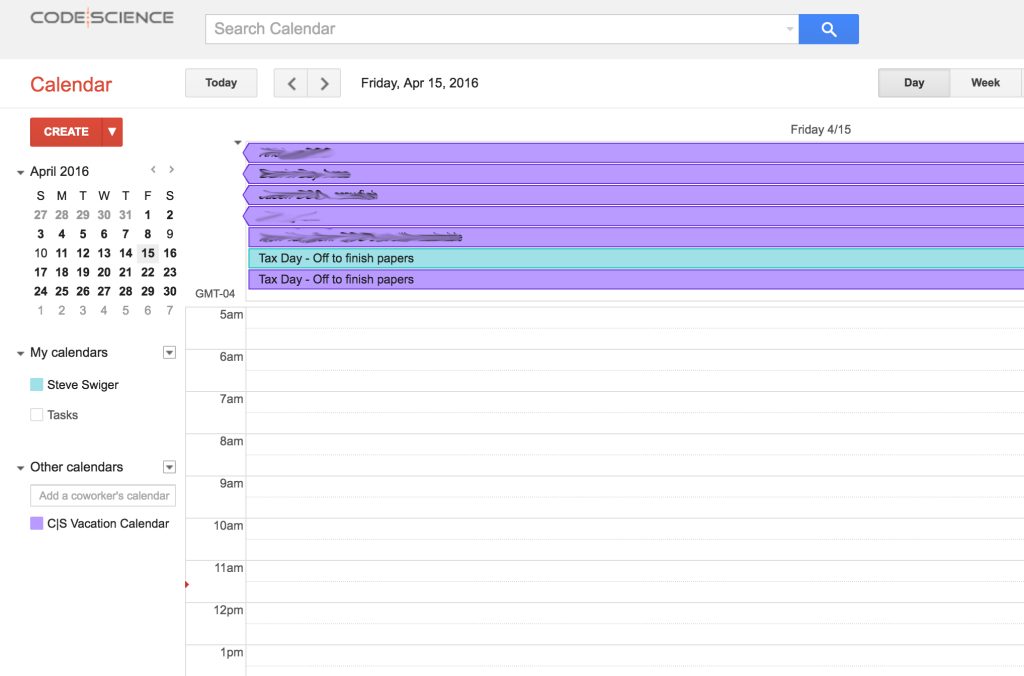
Google Calendar shows the new all-day event on both the user’s personal calendar (light blue) as well as the corporate vacation calendar (purple):
At CodeScience, we love tackling a challenge. Do you have one for us? Let us know!
References:
https://support.google.com/cloud/answer/6158849?hl=en#serviceaccounts
https://developers.google.com/identity/protocols/OAuth2ServiceAccount#overview
https://www.mail-archive.com/[email protected]/msg19551.html